
Proper Squat Form: How to Back Squat Safely, Step by Step
On this page8
- 01The quick checklist for a proper squat
- 02How to set up: stance, bar position, and grip
- 03How to brace: the breath that protects your spine
- 04The descent: sit down and back to proper depth
- 05Knees over toes and a vertical bar path
- 06The drive: standing up without leaking force
- 07Fixing the two big faults: butt wink and knee cave
- 08Warm-up and how to progress the load
Proper squat form means racking the bar securely on your upper back, setting your feet about shoulder-width with toes turned out slightly, bracing your trunk hard, then sitting down and back so your hips and knees bend together until your thighs break parallel. The knees track over the toes, the whole foot stays planted, and you drive back up in a single line. The details below cover the setup, the exact cues, and how to fix the two faults that wreck most squats: butt wink and knee cave.
The quick checklist for a proper squat
Before the how-to, here is the whole movement in one scan. Hit these points and the rest is refinement.
| Phase | What to do | Common fault to avoid |
|---|---|---|
| Setup | Bar on upper traps, feet shoulder-width, toes slightly out | Bar on bare neck; stance too narrow |
| Brace | Big breath into the belly, squeeze the trunk | Breathing shallow into the chest |
| Descent | Sit down and back, hips and knees together | Knees shooting forward first |
| Depth | Thighs at least parallel, spine neutral | Rounding the lower back (butt wink) |
| Drive | Push the floor away, hips and chest rise together | Hips shooting up, knees caving in |
The back squat is the anchor of most strength programs, and it is the same pattern that transfers to jumping, sprinting, and nearly every lower-body lift — which is why nailing it early pays off in every other exercise in our proper lifting form guide.
How to set up: stance, bar position, and grip
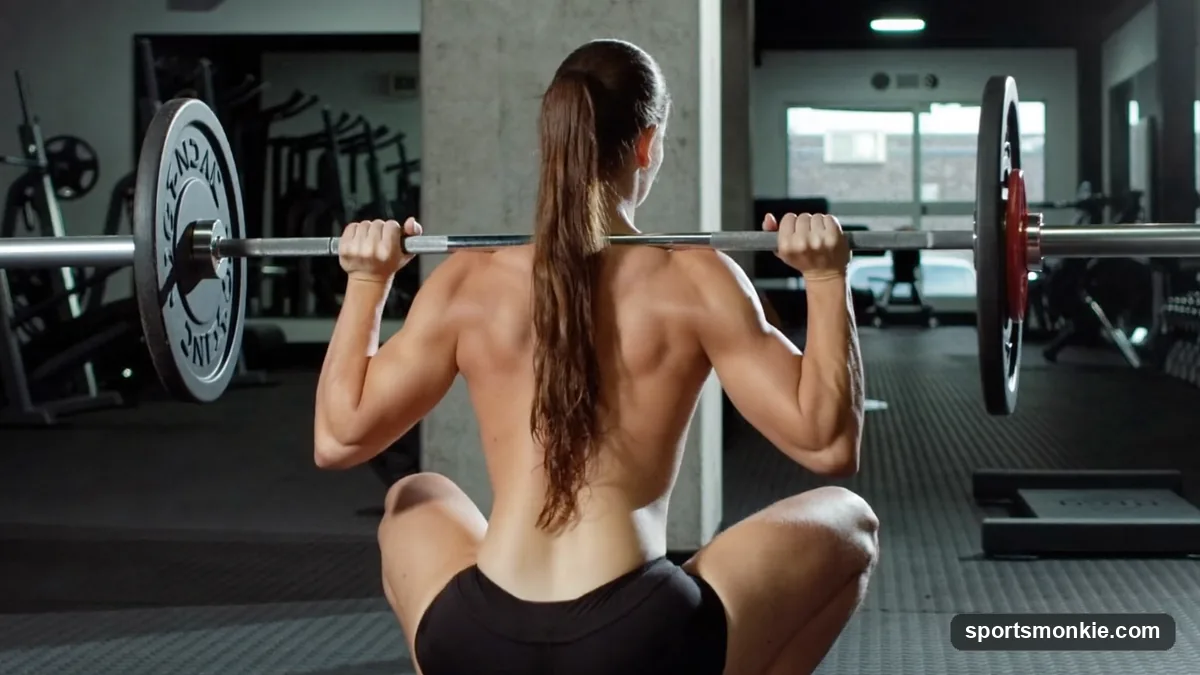
Start with the bar in the rack at about mid-chest height so you never have to tiptoe to un-rack it. Step under, place the bar across the shelf of muscle on top of your traps for a high-bar squat (or a couple of inches lower across your rear delts for a low-bar squat), and pull your shoulder blades together to build that shelf. The bar should never rest on bare spine.
Grip the bar just outside shoulder-width, wrists stacked over the bar rather than bent back under it. Un-rack by standing straight up, then take two or three controlled steps back — no more. Set your feet roughly shoulder-width, toes turned out somewhere between 10 and 30 degrees. There is no single perfect stance: a slightly wider stance with more toe-out suits lifters with less hip mobility, while a narrower stance suits others. Find the position where you can reach depth without your lower back rounding.
How to brace: the breath that protects your spine
Bracing is the step beginners skip, and it matters more than any cue about the knees. Before you descend, take a big breath down into your belly — not a shallow chest breath — and tighten your abs as if bracing for a punch. This 360-degree pressure around your trunk, sometimes called intra-abdominal pressure, turns your midsection into a rigid cylinder that supports the spine under load.
Hold that breath through the descent and the drive out of the bottom, then breathe at the top between reps. On lighter sets you can breathe more freely, but on anything heavy, one breath per rep is the standard. A weightlifting belt can add to this pressure once you are lifting heavy, but it supplements a brace — it never replaces learning to create one yourself.
The descent: sit down and back to proper depth
Begin the squat by breaking at the hips and knees at the same time — think “sit down and back,” not “bend the knees” or “fold at the hips.” Both joints should move together so the bar travels straight down over your midfoot. Control the descent; don’t drop into it.
Keep going until your thighs are at least parallel to the floor, meaning your hip crease drops to or just below the top of your kneecap. Parallel is the minimum for a squat that counts; deeper is fine and often better for building strength, as long as your spine stays neutral and your feet stay flat. If you can’t tell how deep you’re going, film yourself from the side — depth is the single most-cheated part of the lift. This same “one honest rep beats three shallow ones” principle carries over to the proper deadlift form and every other barbell lift.
Knees over toes and a vertical bar path
Two things define a sound-looking squat from the side and front: the bar path and the knees. The bar should travel in a near-vertical line stacked over the middle of your foot the whole way down and up. If it drifts forward over your toes, you’ll feel it as a good-morning-style tip where your hips shoot back and up out of the bottom.
From the front, your knees should track in line with your feet — pointing the same direction as your toes — rather than caving inward. Letting the knees pass in front of the toes is normal and safe, especially in a deep or front-loaded squat; the old “knees behind toes” rule was a balance cue, not an injury rule. What you’re actually guarding against is the knees collapsing inward and the weight rolling to the inside edge of the foot.
The drive: standing up without leaking force
Out of the bottom, drive your whole foot into the floor and think about pushing the floor away rather than lifting the bar. Your hips and chest should rise together at the same rate. The classic fault here is the hips shooting up first, leaving the bar over your toes and turning the lift into a back-dominant grind — a sign the weight is too heavy or your bracing failed.
As you stand, keep actively pushing your knees out so they don’t cave, and finish tall with your hips fully extended, glutes squeezed, without leaning back or hyperextending. Then reset your breath and brace for the next rep. Squeezing the whole foot — spreading pressure across the heel, the base of the big toe, and the base of the little toe — keeps you balanced and stops the knee cave at its source.
Fixing the two big faults: butt wink and knee cave
Butt wink is when your lower back rounds and your pelvis tucks under at the bottom. It usually means you’re squatting deeper than your current ankle and hip mobility allow, so your body borrows range from your spine. Fix it three ways: squat only to the depth where you can hold a neutral spine, widen your stance slightly and add a touch more toe-out, and work on ankle and hip mobility over the following weeks. A small heel lift (or lifting shoes) also buys usable depth for lifters with stiff ankles.
Knee cave (valgus) is the knees dropping inward under load. It comes from under-active glutes and feet that collapse into a flat arch. Cue “screw your feet into the floor” to build an arch and actively spread your knees out over your toes on every rep. If cave only appears on your heaviest sets, the honest fix is to drop the weight, rebuild the pattern clean, and add load back gradually. Rushing weight onto a faulty pattern is the fastest route to a tweaked knee or back.
Warm-up and how to progress the load
Never load a cold squat. Spend 5 to 10 minutes on light cardio and dynamic mobility — leg swings, bodyweight squats, ankle rocks — then ramp up with progressively heavier warm-up sets before your working weight. A typical ramp might be the empty bar, then two or three jumps of moderate load, feeling the pattern each set.
If the barbell squat feels shaky, groove the movement first with the goblet squat form, where holding a single weight at your chest naturally teaches an upright, deep squat, then progress to the bar. Lifters chasing a more upright torso and quad emphasis can branch into the front squat form once the back squat pattern is solid. On days when your lower back is fried or you are training alone without a spotter, the machine variation covered in our hack squat form guide lets you keep loading the quads with the back supported. Add weight slowly — a few pounds when a session feels controlled, not a big jump every time — and treat clean depth and a neutral spine as non-negotiable before the number goes up. General fitness information here is not medical advice; if you have a joint issue, are returning from injury, or feel pain during the lift, stop and consult a qualified coach or clinician before loading up.
Frequently asked questions
How low should you go on a squat?+
Aim for thighs at least parallel to the floor — the hip crease level with or just below the top of the knee. Going deeper is fine and often better for building strength if you can keep a neutral spine and stable feet. Stop shortening the range only when your lower back rounds under the bar, which signals you have run out of usable mobility.
Should your knees go past your toes when squatting?+
Yes, knees traveling past the toes is normal and safe for most people, especially in a deep squat or a front-loaded variation. The old rule against it was a cue to keep weight balanced, not a real injury risk. What matters more is that the knees track in line with the feet rather than caving inward, and that your whole foot stays planted.
Why does my lower back round at the bottom of a squat?+
That rounding, often called butt wink, usually happens when you squat deeper than your current hip mobility or ankle range allows, so the pelvis tucks under to find more depth. Fix it by squatting only to the depth you can hold a neutral spine, widening your stance slightly, and working on ankle and hip mobility over time.
Where should the bar sit on your back when squatting?+
For a high-bar back squat, rest the bar on the shelf of muscle across the top of your traps, just below the base of the neck. For a low-bar squat, it sits a couple of inches lower, across the rear delts. Pull your shoulder blades together to build that shelf so the bar never rests on bare spine.
How do I stop my knees from caving in when I squat?+
Knee cave usually comes from weak or under-cued glutes and feet that collapse inward. Screw your feet into the floor to build an arch, actively push your knees out so they track over your toes, and keep the weight spread across the whole foot. If it only appears under heavy load, drop the weight and rebuild the pattern first.
How much should I be able to squat?+
There is no single number — it depends on bodyweight, training age, and leverages. A common general benchmark for trained lifters is a back squat around 1.5 times bodyweight, but a beginner squatting bodyweight with clean depth and control is already in good shape. Prioritize adding weight slowly over hitting an arbitrary target.
Is it bad to squat every day?+
Daily squatting is not inherently bad, and some programs use it deliberately, but most lifters build strength better with 2 to 3 squat sessions a week and a rest day between heavy lower-body work. Recovery is when muscle adapts. If you squat often, vary the load and intensity rather than going near-maximal every single day.
Sources
Play & tools
Free browser games and tools — no account, no download.
- Play today's Sports Connections — Today's Sports Connections — daily hints, answers, and play the grid.
- Play Guess the NFL Player — A new mystery NFL player every day. Eight guesses, with a clue on each — plus free unlimited mode.
- Explore all our games →
Related guides
Hack Squat Form: How to Use the Machine Safely, Step by Step
Hack squat form means feet mid-platform and shoulder-width, back and shoulders flat against the pads, knees tracking over the toes, and a controlled drop to thighs-parallel — here are the cues, depth, and mistakes.
Proper Bench Press Form: A Step-by-Step Guide to a Safe, Stronger Press
Proper bench press form starts with a shoulder-width-plus grip, retracted shoulder blades, a slight arch, and a bar path that touches the lower chest. Here is how to set up, press, and avoid the mistakes that stall your bench and hurt your shoulders.
Proper Deadlift Form: A Step-by-Step Setup, Hinge, and Lockout Guide
Proper deadlift form starts with the bar over your midfoot, a neutral spine, and a braced core, then drives through the floor to a tall lockout. Here is the full setup-to-lockout checklist plus the mistakes that wreck it.
Proper Basketball Shooting Form: A Step-by-Step Guide
Master proper basketball shooting form with clear cues for your feet, elbow alignment, guide hand, and wrist snap, plus how to build a repeatable one-motion shot.
Bulgarian Split Squat Form: How to Do It Right
Proper Bulgarian split squat form starts with a stance long enough that your front shin stays near vertical, a slight forward torso lean, and the knee tracking over the toes. Here is the step-by-step technique, cues, and common mistakes.
Front Squat Form: Elbows High, Torso Tall, Full Depth
Front squat form starts with a solid front rack, elbows driven high, an upright torso, and a controlled descent to at least parallel. Here are the exact cues, mobility checks, and mistakes to fix.