
Goblet Squat Form: How to Do It Right (Cues, Depth, Mistakes)
On this page8
Correct goblet squat form means holding a dumbbell or kettlebell vertically against your chest, setting your feet about shoulder-width apart, and sitting straight down between your hips with a tall torso until your thighs reach at least parallel — with your elbows tracking inside your knees at the bottom. The weight in front acts as a counterbalance that pulls you into a deeper, more upright squat than you can usually hit with bodyweight alone, which is exactly why coaches use it to teach the squat before ever loading a barbell.
How to Hold the Weight
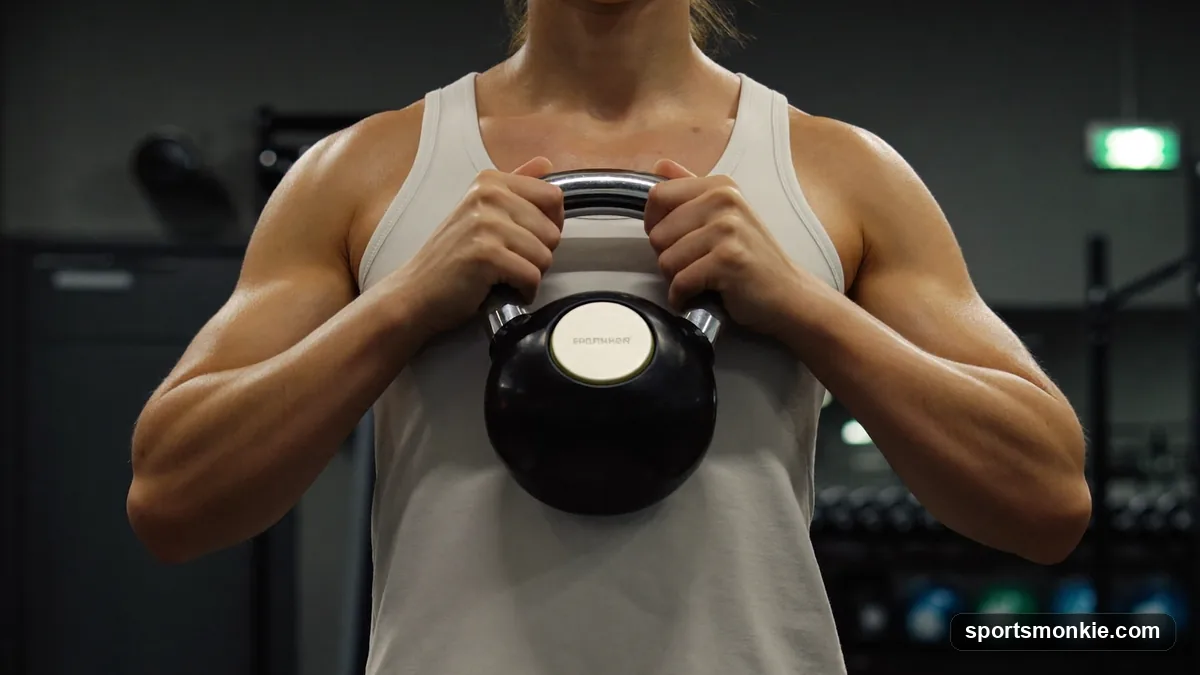
The “goblet” name comes from the way you cradle the load, as if holding a large goblet against your chest. Grab a single dumbbell and cup your hands under the top head so it hangs vertically, or grip the horns of a kettlebell so the bell sits against your sternum. Keep your elbows pointing straight down and tucked close to your ribs rather than flared out to the sides.
The weight should rest lightly on your upper chest, not be pressed away from your body. Your hands guide and stabilize it; they don’t hold it out in front of you at arm’s length. Keeping the load pinned close is what lets it counterbalance your hips and keep your chest up — the whole reason this exercise transfers so well to the proper squat form you’ll use under a barbell later.
Setting Your Stance and Foot Position
Stand with your feet roughly shoulder-width apart, or slightly wider, with your toes turned out about 15 to 30 degrees. This angle lets your knees track in line with your feet through the full range and opens up room for your hips to drop between your thighs.
Spread your weight evenly across the whole foot — heel, outside edge, and the base of the big toe. Think of gripping the floor with your toes to create a stable tripod. Your heels stay flat on the ground the entire rep; if they lift, either the weight is drifting forward or your ankles need mobility work. Before your first rep, take a breath into your belly and brace your core as if bracing for a light punch. That intra-abdominal pressure protects your spine, the same bracing habit that underpins every lift in our proper lifting form guide.
The Descent: Sitting Down Between Your Hips
Start the movement by sitting down and back at the same time — hips and knees bending together, not hips shooting back first. Because the load is in front of you, imagine dropping straight down between your hips rather than pushing your butt way behind you like a hip hinge. Keep your chest tall and your eyes forward.
Lower under control, taking about two seconds on the way down. As you descend, actively push your knees out so they track over your toes and don’t cave inward. Go until your thighs are at least parallel to the floor, and deeper — hips below knee height — if you can do so with a flat lower back and heels planted. The counterbalance of the weight makes this deep position far more achievable than in an unloaded bodyweight squat, so most lifters can reach a full, comfortable depth quickly.
The Bottom Position and Elbow Cue
At the bottom, you should have a built-in check that most other squats lack: your elbows should track down to the inside of your knees. This confirms two things at once — that you’ve reached honest depth, and that your knees are pushed out in line with your toes.
Use it actively. Lightly push your knees outward against your elbows to fire the glutes and lock in knee alignment. Your torso should still be upright, your back neutral (a natural slight arch, never rounded), and the weight stacked directly over your midfoot. Pause for a beat here to own the position rather than bouncing out of it. This crisp, upright bottom position is what carries over to more advanced patterns like the front squat form, where the same front-loaded, elbows-up posture is essential.
Driving Back Up
To stand, drive through the whole foot and push the floor away, leading with your chest so your hips and shoulders rise together. A common fault is letting the hips shoot up first while the chest dumps forward — that turns a squat into a good-morning and dumps load onto your lower back. Keep the weight over your midfoot and think “chest up, knees out” as you rise.
Exhale as you pass the hardest part of the ascent (the “sticking point,” usually just above parallel) and finish tall with hips fully extended and glutes squeezed. Don’t lean back or overextend at the top; a neutral standing position is the finish line. Reset your brace before the next rep. The same “drive through the floor, chest leads” principle applies whether you’re squatting, pulling in a proper deadlift form, or setting up a Romanian deadlift form — the goblet squat is a low-risk place to groove it.
Why the Goblet Squat Teaches the Squat So Well
The genius of the goblet squat is that the front-loaded weight self-corrects the two faults that plague most squatters. First, holding the load in front forces you to keep your torso upright — if you lean too far forward, you simply drop the weight, so your body learns to stay tall automatically. Second, the counterbalance lets you sink into a deep squat without falling backward, teaching your body what full depth actually feels like.
That’s why it’s a staple regression before loading a barbell across your back or front, and a smart warm-up even for experienced lifters. It builds the exact same quad, glute, and core coordination you’ll need for heavier work, without the technical risk. It also pairs well with single-leg patterns like the Bulgarian split squat form to round out lower-body strength, and the bracing and midline stability it drills carry into pressing movements like the overhead press form and proper bench press form.
Common Goblet Squat Mistakes
Holding the weight too far from your chest. Letting the dumbbell drift forward pulls you out of position and hammers your grip and shoulders. Fix: pin it against your sternum, elbows down.
Heels lifting off the floor. This signals the weight has shifted onto your toes or your ankles are tight. Fix: sit back slightly, keep weight on your midfoot, and add ankle mobility work.
Knees caving inward. Valgus collapse strains the knees and leaks power. Fix: push your knees out toward your elbows through the whole rep and consciously spread the floor with your feet.
Rounding the lower back at the bottom. Chasing depth you don’t yet have flexes the spine under load. Fix: only squat as deep as you can hold a neutral spine, and improve hip and ankle mobility over time.
Rising hips-first. Letting the hips shoot up while the chest drops turns the lift into a hinge and overloads the back. Fix: lead with your chest and keep hips and shoulders rising together.
Warm-Up and Progression
Warm up with 5 to 10 minutes of light movement and dynamic mobility — leg swings, bodyweight squats, and ankle rocks — before loading up. Start with a weight you can control for 8 to 12 clean reps: often a 15-to-30-pound dumbbell or kettlebell for beginners. Master full depth with a tall torso before adding load, then progress in small increments once your form holds for all your target reps.
A sensible starting prescription is 3 sets of 8 to 12 reps, two or three times a week, with a day of recovery between sessions. As you get stronger, the goblet position eventually caps how heavy you can go — you can only load what you can pin to your chest — and that natural ceiling is your cue to graduate to barbell squats, or to bridge toward bodyweight strength work like learning how to do a pull-up for balanced full-body training.
This article is general fitness information, not medical or coaching advice. If you’re new to lifting, returning from an injury, or managing a joint, back, or cardiovascular condition, consult a qualified coach or clinician before starting — and stop any exercise that causes pain beyond normal training effort.
Frequently asked questions
How do you hold the weight in a goblet squat?+
Hold a single dumbbell or kettlebell vertically against your upper chest, cupping the top head of the dumbbell or the horns of the kettlebell with both hands. Keep your elbows pointing down and tucked close to your ribs, not flared out. The weight should rest lightly against your sternum so your torso stays tall and your hands only guide it, not press it away.
How deep should a goblet squat go?+
Aim for thighs at least parallel to the floor, and go deeper — hips below knee level — if you can keep a neutral spine and heels flat. The front-loaded weight acts as a counterbalance that makes a deep squat easier than a bodyweight squat for most people. Stop at the depth where your lower back starts to round, and work on mobility to gradually earn more range.
What muscles does the goblet squat work?+
The goblet squat primarily trains the quadriceps and glutes, with the hamstrings and adductors assisting the hip and knee extension. Because the load sits in front of you, the core, upper back, and shoulders work isometrically to keep your torso upright throughout the rep. That combination is why it doubles as both a leg builder and a full-body postural exercise.
Why do my elbows go inside my knees in a goblet squat?+
At the bottom of the squat your elbows should track down toward the inside of your knees. This is a built-in cue: it confirms you have reached real depth and that your knees are tracking out over your toes rather than caving inward. Gently pushing your knees out against your elbows also engages the glutes and keeps the knees aligned.
Is the goblet squat good for beginners?+
Yes. The goblet squat is one of the best entry points to squatting because the front-loaded weight naturally keeps your chest up and helps you sit into a deep, controlled position. It teaches the movement pattern used in the back squat and front squat with far less technical risk, which is why coaches often use it before loading a barbell on the back.
How much weight should I use for goblet squats?+
Beginners typically start with a 15-to-30-pound dumbbell or kettlebell and focus on hitting full depth with a tall torso before adding load. Progress in small jumps once you can complete your target reps with clean form. The goblet position eventually limits how heavy you can go, since you can only hold what you can keep pinned to your chest — that ceiling is a natural cue to graduate to barbell squats.
Sources
Play & tools
Free browser games and tools — no account, no download.
- Play today's Sports Connections — Today's Sports Connections — daily hints, answers, and play the grid.
- Play Guess the NFL Player — A new mystery NFL player every day. Eight guesses, with a clue on each — plus free unlimited mode.
- Explore all our games →
Related guides
Bulgarian Split Squat Form: How to Do It Right
Proper Bulgarian split squat form starts with a stance long enough that your front shin stays near vertical, a slight forward torso lean, and the knee tracking over the toes. Here is the step-by-step technique, cues, and common mistakes.
Front Squat Form: Elbows High, Torso Tall, Full Depth
Front squat form starts with a solid front rack, elbows driven high, an upright torso, and a controlled descent to at least parallel. Here are the exact cues, mobility checks, and mistakes to fix.
Hack Squat Form: How to Use the Machine Safely, Step by Step
Hack squat form means feet mid-platform and shoulder-width, back and shoulders flat against the pads, knees tracking over the toes, and a controlled drop to thighs-parallel — here are the cues, depth, and mistakes.
How to Do a Pull-Up: Strict Form, Cues, and Progressions
To do a pull-up, hang from an overhand grip, pull your shoulder blades down, drive your elbows to your ribs until your chin clears the bar, then lower under control. Here is the full step-by-step with beginner progressions.
Proper Squat Form: How to Back Squat Safely, Step by Step
Proper squat form means a braced trunk, hips and knees bending together, knees tracking over the toes, and thighs breaking parallel — here is the setup, the cues, and the fixes for butt wink and knee cave.
How to Do Depth Jumps: Box Height, Contact Time, and a Safe Progression
To do a depth jump, step (don't jump) off a 12-18 inch box, land on the balls of your feet, and rebound upward instantly — spending under 0.25 seconds on the ground. Here is the full technique, box-height math, and a safe 6-week progression.